lørdag den 30. august 2014

Memory circuit wired

This is the memory card for my Z80 system. It contains a single 8x2k SRAM, the 6116-2, one of my favorite SRAM's, because its name is a palindrome. A 2716 EPROM of same size (and pin compatible, by the way) is used as system ROM. Address decoding for chip select with a 74139. Memory decoding entirely after Donn Stewart's Z80 computer. A more refined point-to-point wiring technique than with the indicator card, and i think it's really neat! Maybe even more so than wire-wrap. 

Using the same wire to make little ties for the wire bundles. 
For this method, start by wiring power, then control logic, and THEN DATA and ADDRESS buses, as you see, they are the ones who takes up space. Make sure that the wires are approximately the right length to be routed, and then after soldering of a bundle, begin "neating" with wire ties, either free floating or though holes in the PCB. excess length can be huddled up at one end (here, at the connector).  

Some tips for starting a microcomputer project


When setting out to build a microcomputer, especially for a first computer project, there are a lot of unknowns. There's a lot of project schematics out there, some more advanced than others, and a lot of them seems like just a schematic with no notes attached. 

Since none of my projects are in any state near "complete", this is simply some of the points I've noticed so far. 

 - Decide on a processor  
You'll probably need to base your computer around a microprocessor. Wiring your own is an interesting idea, but leagues ahead of most computer hobbyists (assuming they still exist). 

I'd recommend an 8-bit processor, since that's basically all you need, and there's no need adding to the complexity.

Popular ones include the ZILOG Z80, my favorite. It is fairly easy to interface to other hardware, only needs a single phase clock, and the instruction set (for programming) seems rather intuitive to me. The MOS 6502, made famous by the Commodore and Acorn computers is also pretty easy, and has found many applications in DIY computers in the past, though it does need a two phase clock, and the instruction set is a little more confusing ( i MAY be biased on this, if you started learning 6502 assembly, you'd probably feel the same way about the z80's).
The RCA COSMAC 1802 , notably used in the COSMAC ELF DIY computer, is very easy to interface, and RUNS WITHOUT A ROM, which eliminates the need for a device programmer, is very rare, and although classic and awesome, i really wouldn't recommend it for first time builders. The COSMAC ELF articles talk about a video interface on a chip, which is even harder to find. Don't bother, unless you REALLY want to.

 - Learning to program 
You'll need to be able to program your ROM, so you'll need to learn %PROCESSORNAME% assembly. So explained in BASIC:

10 you build a microcomputer to learn assembly, 
20 for which you need a microcomputer 
30 goto 10

See the problem? Yeah, you NEED an actual computer to learn to program (or an emulator, but that's cheating).
You can get decent priced micro's still, use Wikipedia to find which mico's uses your processor. I've learned z80 assembler on a SINCLAIR ZX spectrum +2, which i found at a flea market.

 - READ
You need to find literature on system architecture. many books on this matter were published in the late 70's and the 80's. A lot of electronics can be learned by "monkey see monkey do" but understanding memory interfacing, I/O mapping (and some logic) will help you immensely.


fredag den 29. august 2014

Something else entirely

This is NOT Z80 stuff! This is an artifact of early computing, something i found at a flea market for next to free:

This is a program! It may be hard to recognize, but this is a plugboard from an IBM tabulating machine. You actually connect the processor structure to do different stuff, no microinstructions! - I've yet to understand completely how this works, but nevertheless, this is almost a work of art! It is not made by IBM, but a company called MAC PANEL in Belgium. There was a label on it stating that it is from 1970, so even at that time, it would've been obsolete, these were popular in the late 40's to the 60's. Presumably for the IBM 421 tabulating machine. The little grey plastic boxes are IBM branded hubs, interconnecting up to 3 of the plugs, which by the way, are 4mm banana plugs, though longer and "pointy". The program seems intact, no wires looks to have been tampered with (there's no dust on the edge of holes where plugs has been seated), so perhaps it's still executable!

Definitely a keeper.

The indicator card done

The indicator card made, with a different construction technique, since i wanted to exercise different prototyping methods for digital hardware. Okay, okay; I ran out of wire wrap wire.

Thiss is 26 AWG wire, thicker than W-W. wire, but not much. Still so thin the insulation goes through the standard PCB holes. gives a good deal of strain relief, and allows for use as wire binders.

Not much more to tell about this:


The processor card

The processor card is basically just a z80 with buffered buses and some functions. A clean reset circuit, and two clocks are on board as well. A manual step clock, and a slow clock ( a couple of Hz). This board, the clock and reset in particular, is inspired by CPUville's homebrew z80 project. This also served as the inspiration for this project. 

This is the card. The red % button is the reset, and the toggle switch is the manual clock. the header matrix to the left of the processor is to select the clock via jumper, so you don't accidentally switch on two clocks at the same time. 
Wire color code: RED: When it was closest. BLUE: When that was closest. Power is mainly routed on the solder side.


Computer base and indicator card!

OK, so these come pretty close one after another, since i'm actually past these steps, but behind on making a blog about it.

Well, the base is made, as mentioned from wood, and the Indicator card is made.
Well this is the indicator /bus display card. It is nothing fancy, just a binary readout of the entire bus. Upper row are DATA (7-0 in reading order), the two rows are ADDRESS(15-0), and the lower six are: Reset, Clock, Memrq, IOrq, RD and WR.
the four chips, 74LS241, is simply set up as noninverting buffers, which has some problems, since most of the control signals are active low. Good thing that won't confuse me when this machine doesn't do a thing!


Here be the base of the computer, the two cards installed. The dip socket on the bus card is to access the data bus, since i got the idea of wanting a little plug with pull-down resistors, to put the processor into free-run mode (just counting addresses, executing NOP's). Room is made for binary I/O, PSU, later: QWERTY keyboard, floppy drive, hard drive. 

Z80 microcomputer (SYSTEM B)

This is the progress on my Z80 computer project! I've recently received the needed components, and has begun construction.

The idea is, to make a eurocard (that's a PCB standard size) and backplane based microcomputer, which can be operated as simply as possible, but that also will allow for infinite expansions. 

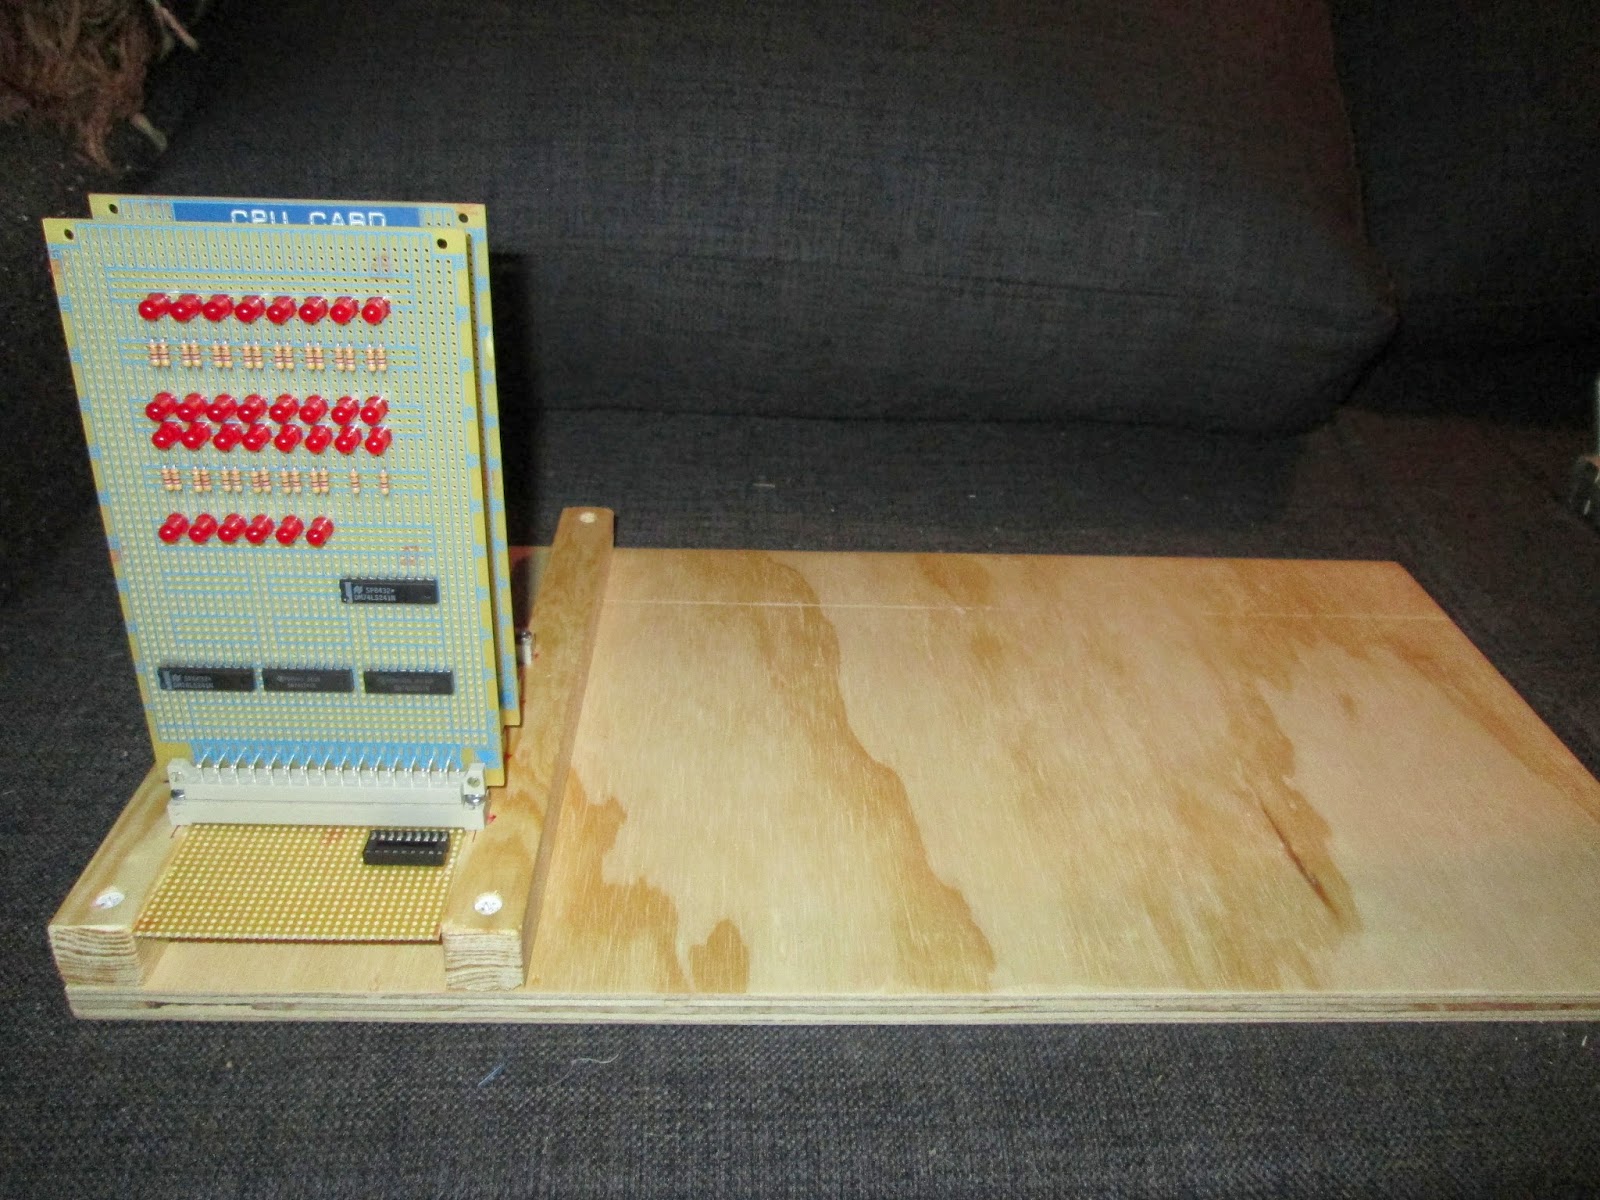
Phase 1 consists on little more than a buffered CPU card with clock, and a bus display card, showing the logic level of the address and data bus as well as some control bus signals.

The "enclosure" is made of wood, to give that 70's homebrew feel, and the plan is not to use any component that didn't exist in the early to mid-80's.


Above can be seen the first card to be plugged into the backplane. The connectors are DIN 41617 connectors, because i like how the pins match up with regular stripboard. The card pcb's is IC-island types, FR4 material. The 4 20-pin packages are simply buffers for various busses.

I use a mix of prototyping techniques, here it's wire-wrap, though i use standard 0.1-inch header pins as wrap posts. This has two major advantages, 1) The card becomes very low-profile, with the height being about 1,5 cm instead of the almost 4 with ordinary wrap sockets. 2) each socket costs a fraction of a wire-wrap one. The connection might not be as good, though. I've yet to experience problems with that.